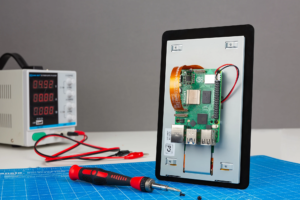
The Raspberry Pi Touch Display 2 is now available. It excites both enthusiasts and professionals. This new version introduces a 7-inch touchscreen with a resolution of 1280×720. This offers sharper visuals and a better user experience than before. The Raspberry Pi Touch Display 2 is sleeker and thinner because the display driver PCB is now inside the enclosure. This change makes it more visually appealing and compact.
Key Takeaways
- The new Raspberry Pi 1280×720 display offers sharper and clearer visuals.
- Integrated display driver PCB makes the design sleeker and thinner.
- Provides an improved user experience over previous models.
- Compact design adds to the aesthetic appeal.
- Perfect for various Raspberry Pi projects and innovations.
Overview of the Raspberry Pi Touch Display 2
The Raspberry Pi Touch Display 2 is a big step up from earlier versions. It uses new technology to make your experience better. This latest display works perfectly with Raspberry Pi devices. It looks modern and works better.
Introduction to the New Display
The improved Raspberry Pi touch display is much better than the old ones. It has a Raspberry Pi 1280×720 touchscreen for sharper images. It’s also slimmer, which makes it fit into projects more easily. Now, everything needed for the display is in one piece. This makes setting it up quick and easy.
Comparison with the Original Version
The new Raspberry Pi Touch Display 2 thinner design is much clearer than the first version. Let’s look at how they compare:
| Feature | Original Display | Raspberry Pi Touch Display 2 |
|---|---|---|
| Resolution | 800×600 | 1280×720 |
| Design | Standard | Thinner design |
| Integration | Separated components | Single unit |
| Ease of Setup | Moderate | Simplified |
The improved Raspberry Pi touch display makes high-res projects easier and looks great doing it.
Technical Specifications
The Raspberry Pi Touch Display 2 brings a fresh and stylish update. It includes top-notch features, showing off the latest in small computing screens.
Display Type and Resolution
The device features a 7-inch RGB TFT screen. Its resolution is 1280 x 720 pixels. This ensures lively colors and clear images, perfect for any project.
Touch Panel and Surface Treatment
This model also introduces a 5-point capacitive touch panel. This allows for easy and various touch gestures. Plus, an anti-glare surface makes it easier to see, reducing glare for a better experience.
Compatibility with Raspberry Pi Models
This thinner, newly designed display works with many Raspberry Pi models. However, it does not work with the Pi Zero series. This wide compatibility makes it simple to use with existing setups.
Power Consumption and Supply
The Raspberry Pi Touch Display 2 is energy efficient. It uses a 5V DC connection from the GPIO headers. This makes powering the device easier across different Raspberry Pi setups.
Here’s a quick look at the key specs:
| Specification | Details |
|---|---|
| Display Type | 7-inch RGB TFT |
| Resolution | 1280 x 720 |
| Touch Panel | 5-point capacitive |
| Surface Treatment | Anti-glare |
| Compatibility | All Raspberry Pi models except Pi Zero series |
| Power Supply | 5V DC via GPIO headers |
Raspberry Pi Touch Display 2 with 1280×720 resolution, thinner design launched f
The Raspberry Pi touch display 2 with 1280×720 resolution brings exciting advancements. It features a 9-inch panel and offers sharp, vivid images. The display boasts 600 nits of brightness and a 1000:1 contrast ratio.
Its thinner design launched f boosts portability without sacrificing quality. A 10-point touch system makes it highly responsive. This makes it ideal for educational purposes and DIY projects.

The compact Raspberry Pi display provides a 160-degree viewing angle. It covers 70% of the NTSC color spectrum, offering a broad and colorful experience. A 16:9 aspect ratio is perfect for videos and movies.
It works well in temperatures from -30°C to 85°C, consuming only 8W of power. This ensures it’s versatile for different environments.
| Specification | Details |
|---|---|
| Resolution | 1280×720 |
| Brightness | 600 nits |
| Contrast Ratio | 1000:1 |
| Color Space | 70% NTSC |
| Touch Points | 10-point touch |
| Panel Size | 9 inches |
| Aspect Ratio | 16:9 |
| Viewing Angle | 160 degrees |
| Operating Temperature | -30°C to 85°C |
| Power Consumption | 8W |
| Connectivity | Standard HDMI, Type C (touch), 3.5mm Audio Jack |
| Included Accessories | 12V 3A Adapter, USB C-USB A Cable, HDMI Cable, FFC Cable, Install Screws, User Manual |
This compact Raspberry Pi display changes how we use single-board computers. Its sleek design and powerful specs offer new possibilities for all users.
Setting Up the New Raspberry Pi Touch Display 2
Setting up the Raspberry Pi Display 2 is easy and fast. You just need a few tools and a little time. This guide covers how to put the display together and set up the software. That way, it works the best it can.
Step-by-Step Assembly
First, make sure you have your Raspberry Pi board and the new touch display. Putting it together is simple:
- Attach the Raspberry Pi board to the display back with screws provided.
- Use the ribbon cable included to connect the display to the board. Make sure it fits right to keep the touchscreen working well.
- Before turning it on, check all wires and connections are good.
If your touchscreen doesn’t work, check the ribbon cable on the LCD’s back. A loose cable might stop touch inputs from working.
“Success with certain LCD models, like the Eleduino 3.5 version A, really depends on following good tutorials and choosing the right screen type, like flexfb.”
Software Installation and Configuration
After you put the Raspberry Pi touch display together, you need to set up the software. Follow these steps to make sure your display works with the Raspberry Pi OS:
- Update your Raspberry Pi with the newest Raspberry Pi OS.
- Run the command sudo apt update && sudo apt full-upgrade to update the system software.
- To turn on SPI, go to the raspi-config menu under advanced settings.
- Get and set up the right display drivers. This might mean running certain commands or using SD card images from the display maker.
- If there’s a problem like a white screen after rpi-update, check and change your driver settings.
| Issue | Solution |
|---|---|
| Touchscreen not responsive | Check ribbon cable connections, update drivers |
| Blank white screen | Fix driver modules, skip certain updates |
| Splash boot screen errors | Look at device settings, see display model guide |
By doing these steps, your Raspberry Pi Display 2 will work well. It will have full touch support and display correctly. Getting the software right on your Raspberry Pi is key to using your new touch display well.
Applications and Use Cases
The Raspberry Pi Touch Display 2 offers strong capabilities and better touch functions. It’s perfect for many uses. With its 5-inch capacitive touchscreen and 1280×720 resolution, visuals are clearer. The touch is more exact. A quad-core Cortex-A72 processor backs the display, enabling a broad range of applications.
It’s great for home automation interfaces. The display and smooth touch make smart home systems easier to use. Plus, it’s portable. You can move it to different rooms, controlling your smart home everywhere.
It shines in portable computing, too. Its small size and touch features are ideal for handheld devices or terminals. Pairing it with a Raspberry Pi model lets you create strong, flexible computers.
Education benefits from the Raspberry Pi touch screen. Its easy interface and touch make learning tools more interactive. This helps teachers and students with digital content. And, it’s easy to put anywhere in schools.
In digital signage, the display is key. It combines clear resolution and solid performance for top-notch communication. It’s perfect for ads or info in public and retail areas.
For multimedia fans, there are unlimited uses. The high-res screen and strong processor are great for interactive projects and digital art. It enhances audio-visual experiences too.
Overall, the Raspberry Pi Touch Display 2’s wide range of uses makes it indispensable. From home automation to digital signs, it’s a top choice in touch technology. Its features highlight its lead in the market.
Conclusion
The launch of the Raspberry Pi Touch Display 2 starts a new chapter for Raspberry Pi accessories. It brings higher resolution and a slimmer design. These features make it perfect for both developers and educators.
The Raspberry Pi Touch Display 2 stands out with its improved compatibility and efficiency. As reviewed, this new model outperforms the old one in many ways. It offers better display and easier integration for projects.
The Raspberry Pi Foundation promises to keep this product available until at least January 2030. This commitment means users can plan long-term projects without fears of the product being discontinued. The latest display shows the brand’s ongoing innovation and support for its users. This ensures that everyone can bring their creative ideas to life.

